Showing posts with label Blue Ridge Beauty. Show all posts

Sunday, May 31, 2015

Three Quilts Gifted...


Over Memorial weekend, Andy & I traveled to Illinois for a family visit.  On the way through Ohio we stopped at my brother's house for a visit and to deliver some quilts that I had made for three of his grown children.  

The first one was for Leah.  The embroidered top was purchased from Ebay and I added the borders and hand quilted it.


The second quilt was for Sarah.  This was a top that I started as a craftsy.com block-of-the-month, but ended up deleting a couple of their blocks that I didn't like and adding a bunch more that I found online.  It is hand quilted. 


The third quilt that I gifted in Ohio went to my nephew, Daniel.  He served our country for 4 years in the Marines just a short while ago, so I made his "Red, White, and Blue" in tribute to his service! The pattern for this one is "Blue Ridge Beauty" by Bonnie Hunter and is hand quilted, also.


I gifted one more quilt when we got to Illinois, but I will blog about that in a separate post.

All the quilts were received with much appreciation and the appropriate amount of "oooooh's and ahhhhh's"...and that does a quilter's heart good!  :)

Loretta

Sunday, December 1, 2013

Quilt Update....

Quote for the Day:
"Idle hands are the devil's workshop"
~English proverb

I bet you thought that saying came from the Bible!  But no, it is "similar" to something that is said in the Bible, but that direct quote is not from the Bible.  But my dad sure liked to quote it to us kids when we were young.  It was his way of getting us to do work!  LOL  It made me think that if I didn't get busy doing something then the devil was going to come inhabit my body!  Or at least my hands!

Okay...onward and upward.  I've got a quilting update today!

I finally finished sewing down the binding on my Blue Ridge Beauty quilt, a pattern by Bonnie Hunter's "Adventures With Leaders and Enders" book!  All it needs now is a label and a washing!


Here's a close-up of the border...


And a close-up of the back and corner showing the hand quilting detail.  I used blue/mauve/beige variegated thread, which shows up better in person than it does in the pictures.


Loretta

Monday, September 2, 2013

Homemade Applesauce...

Quote for the Day:
"If all the cars in the United States were placed end to end,
 it would probably be Labor Day Weekend."

~Doug Larson 

Hope everyone is enjoying their Labor Day holiday...which is basically your last day off till Thanksgiving!  Unless you are a government employee...which means you will have a half-dozen more holidays between now and Thanksgiving.  Or a nurse...which means you are probably working TODAY and are scheduled for Thanksgiving, too!  :(  

I'm lucky that even though I'm an RN, I work in a department that is Monday through Friday, with weekend call 3 times a year and a holiday call every other year.  :)  Since Labor Day is neither a "work day" nor a "call day" for me, I'm off today!  YAY!

I put the last of the pears and apples into the crock pot yesterday afternoon with one 3" cinnamon stick and about 3 tablespoons of white sugar.  I cooked it on "low" for a few hours and then turned it to "warm" overnight.  

This morning they looked like this...


Had I not have left the peels on the apples and pears, I would have just taken a potato masher and mashed them up a little.  (I kinda like a few chunks in my applesauce.)  However, because I didn't want the peeling just floating around, I went ahead and used my immersion blender and blended them a LITTLE bit.  (Yes, the $2.00 thrifted Braun immersion blender!!!)  


There are still a few chunks, but I tried to blend up the peelings as best as I could.  I got 3.5 pints out of this batch and water-bathed canned the 3 full pints.  


I didn't have any lemon juice to add to the apples/pears to keep them from turning brown, so before putting them in the crock pot, I soaked them in ginger ale soda, which contains citric acid...the ingredient in lemon juice that helps keep fruit from browning.  It kinda worked, but they still turned a little bit brown.  Oh well, I can tell you that it TASTES DELICIOUS!!!   I had some with my lunch today while the sauce was still a little warm!   Mmmmmm!  :)

I'm heading into my sewing room to work some more on the Blue Ridge Beauty quilt.  I'm very close to being done with it!!!


There is a feeling that comes over you when you can see the end in sight!  It's a feeling of satisfaction but also anticipation as you look forward to the NEXT quilt to go into the frame!!!

Loretta

Saturday, August 3, 2013

Updates From the Homestead...


 Quote for the Day:


Thought I'd update you all on a couple things going on around here...

First off, construction was started on our garage and workshop on the new property this week.  They were only able to work on them for 2 days this week because of rain, but things are moving right along, anyway.

Garage, street-view:


Garage, inside, looking from right front corner to left side:


Yes, this thing is HUGE for a garage...24' deep by 32' long!  :)  

The beginings of Andy's workshop located behind the garage:


The workshop is slightly smaller at only 20' deep by 32' long.  Still, though, plenty of room for storage of Andy's "stuff".  


Several months ago, a new client found me through the local quilt store and asked me to repair the bindings on 3 vintage quilts she had that had been passed down through her family.  I posted about the first one here.   I finally got around to completing the second one this past week.


This is that horrible red fabric that I posted about that just kept bleeding, no matter how many times I washed it.  The last time I rinsed it in vinegar, but it was still bleeding.  At that point I just gave up and went ahead and applied it to the quilt.  I have warned the customer that it bleeds and recommended that if she washes the quilt that she should use several color catchers to keep the red from bleeding onto the white.   

She has one more quilt that she wants me to repair the binding on, and when she picks up this quilt, she'll drop off that one for me to work on.  

And, last but not least, here is the latest update on the Blue Ridge Beauty quilt that is currently in my quilt frame...

This is the center block, meaning...I'M HALFWAY DONE!  woohooo!


You can see that now my lines of stitching are going in the opposite direction...following the layout of the quilt.


Uh-oh!!  Points that don't quite match???  Say it ain't so, Loretta!!  

Yep.  Just keepin' it real...

Loretta

Wednesday, July 24, 2013

Some Organizing and a Quilt Update...


Quote for the Day:
"It's a sure sign of summer if the chair gets up when you do."
~Walter Winchell


We got back home on Sunday from our visit to our son and daughter-in-law's house in Georgia.  I brought back with me one doozy of a cold.  I've been really sick with this cold...and hoping that my left eardrum doesn't burst from the pressure because my hearing still hasn't returned in my right ear, yet.   :(

I also brought back with me several baskets that I found when we were out "thrifting" while there.  I like to use baskets for organizing, and my stash of square and rectangular baskets was nil.   I've gone to only buying baskets that have straight sides and are, preferably, square or rectangular because they are the best at utilizing space without wasting any.  I will occasionally buy oblong baskets as long as they have straight sides, and only buy round baskets if I have a specific use for that particular round one or if it is really small round basket...the kind that are good for corralling things on a desk or table.  So, whenever we are out "thrifting", I look for baskets that are good for organizing...and are CHEAP!  BTW...any basket with straight sides will do.  If it is an ugly color, I just spray paint it white.  If it has a stationary handle, I often remove it by cutting it off level with the basket part.  This is easily done with a hacksaw, or, if really thin, a pair of scissors will suffice.

Since I've been sick and haven't been feeling up to doing much, I decided yesterday that I'd tackle a small organizing/decluttering project in the downstairs bathroom that's been needing done for a LONG time.  


The bathroom downstairs is really small...well...actually BOTH bathrooms in this house are really small...but I digress.  Because the bathrooms are small, we only have pedestal sinks and there is no storage cabinet underneath them.  Instead, I have this bookshelf that we found in the garage when we moved here 15 years ago.  It was from someplace industrial because it was painted a machine-gray and had safety-related stickers on it.  LOL  I removed the stickers and painted it white.  Usually it has a pair of battenburg lace curtains covering the front held on by a tension rod, but I removed them while I cleaned this cabinet.  They need washing before being put back up, so they still aren't up.

Anyway...back to the ugliness of the contents of this cabinet.  Those orange and red bins are really flimsy and the sides kept coming un-snapped, so they had to GO!  


I went through everything being stored and threw away all the old hair products, etc., that weren't being used.  I grabbed some of the baskets I had found and went to work.   I refolded the towels in thirds so they would stack neater.  I would still like to find an appropriate basket to hold those bottles on the bottom shelf, but for now, they will be fine.

I had planned on cropping out the stuff on top of the cabinet so I didn't straighten it up, but I decided to keep it in the picture and just "keep it real", as they say.

Now...on to the quilting update.  

After not doing any quilting for 2 weeks while we were away, I've been "itchin' to be stitchin' ".  I've been working on the Blue Ridge Beauty since we've been back and yesterday I gave the rollers another crank and found THIS...


Those arrows at the top of the frame are pointing to the CENTER BLOCK of the quilt!  That means I'm very close to being 1/2 done with this quilt!!!  I find that diagonal lines go fairly quickly, so that's why I'm moving right along on this quilt.  The diagonal lines on the other end of the frame that you can't see from here go the opposite direction so they meet with a "V" down the middle of the quilt.  

Loretta

Tuesday, June 11, 2013

And Sew On and Sew On...

Quote for the Day:
"I've been put on this earth to sew and finish a certain number of things. 
I am so far behind right now…I will never die!"
~author unknown

The Blue Ridge Beauty quilt is now marked, loaded into the hand quilting frame, and even has the first few stitches in it!  YAY!


I was going to piece together a backing for this quilt, but I looked and looked through my yardage and just couldn't come up with something that I liked for the backing.  I had some 108" wide unbleached muslin in my stash, so I decided to use it instead.  I know, I know...BORING!!!  But, oh well...it will be a breeze to quilt through since muslin is lightweight and all.  I'm making this quilt as a gift for someone (who doesn't read my blog, obviously!  LOL) and I was afraid that person might not find a pieced backing as attractive and interesting as I do, so I went with the "safe" route...a solid unbleached muslin.  

I used to use wide unbleached muslin a lot for backings when I first started quilting and I would buy it by the bolt when I could use a coupon at Joann's and get it for 50% off.  But as I've "grown" (a nice word for "aged"), I've found that I like a print on the quilt backing.  Sometimes I buy wide backings to match or "compliment" the front, and sometimes I piece backings...sometimes from scraps/leftovers...especially if the quilt is for me or for someone that I know would appreciate an interesting quilt back.

However, my eyes were opened by a quilter I met recently who said that she only likes plain backings on her quilts because she tries to keep with the way quilts were originally made...with plain, boring backs.  :(   That opened my eyes that not all people think the back of the quilt should be as interesting as the front.  And since this quilt is going to someone who may not have seen or experienced pieced backings, I decided to go the "safe" route.

Okay...so I whimped out!  :(   I hope the quilt is appreciated by the person it will be going to...even with it's boring back!  LOL

This top measures 94" X 108", so it will probably take me a good 6 months to finish it.  I have a pad of paper on my silver tray of hand quilting supplies (you can see the silver tray sitting on the quilt in the top picture) and I make notes of things to remember that come to me while I'm hand quilting, be it the time and date of a TV show I see advertised, or just things that I want to remember to do.  On that pad, I write the date that I start quilting a quilt so I can look back and see just how long it took me to quilt it.  Sometimes I surprise myself and finish it quicker than I thought I would.  Other times I find that it took me longer than I had originally thought, though I am getting faster with experience.  It's just one of those things that I like to keep track of.  Ooops...my OCD is showing!  LOL

Loretta


Saturday, June 8, 2013

Ready To Go Into The Frame!!!


My Blue Ridge Beauty blocks are now a FLIMSY(!!)...ready to be marked and loaded onto the hand quilting frame!  YAY!!!


I still need to figure out a backing for it.  I don't want to buy more fabric for the backing, so I think I'll pick something out from the $2/yard fabric that I bought from my LQS (local quilt store) several months ago, and piece the backing.  

I don't have any batting big enough for it (94" X 108"), so I'll need to go the quilt store on Monday and pick up a batt. 

This top is so big, I had to turn is sideways to get it to fit on our bed for photographing!  LOL

This quilt was made as a "Leader/Ender" project out of scraps leftover from previous quilts...all except for the red and blue borders...that came from yardage in my stash.   It's amazing what you can make from leftover scraps!

Loretta

Thursday, June 6, 2013

What's On My Design Wall???

Quote for the Day:
"When life gives you scraps make a quilt!"
~author unknown

Because I was on vacation for 9 days and then had to work when I got home, I've been 2 weeks without doing any quilting!  I thought I'd pull out some quilt blocks that I had worked on a year or so ago, but hadn't sewn together into the top, yet.  I had all the blocks for the quilt completed when I put them away, so all I have to do is to sew them and make them into a top.  The sooner I can get the top sewn together and borders on, the sooner I can get it into the frame.  Right???  And a quilt in the frame makes me VERY VERY HAPPY!   :)

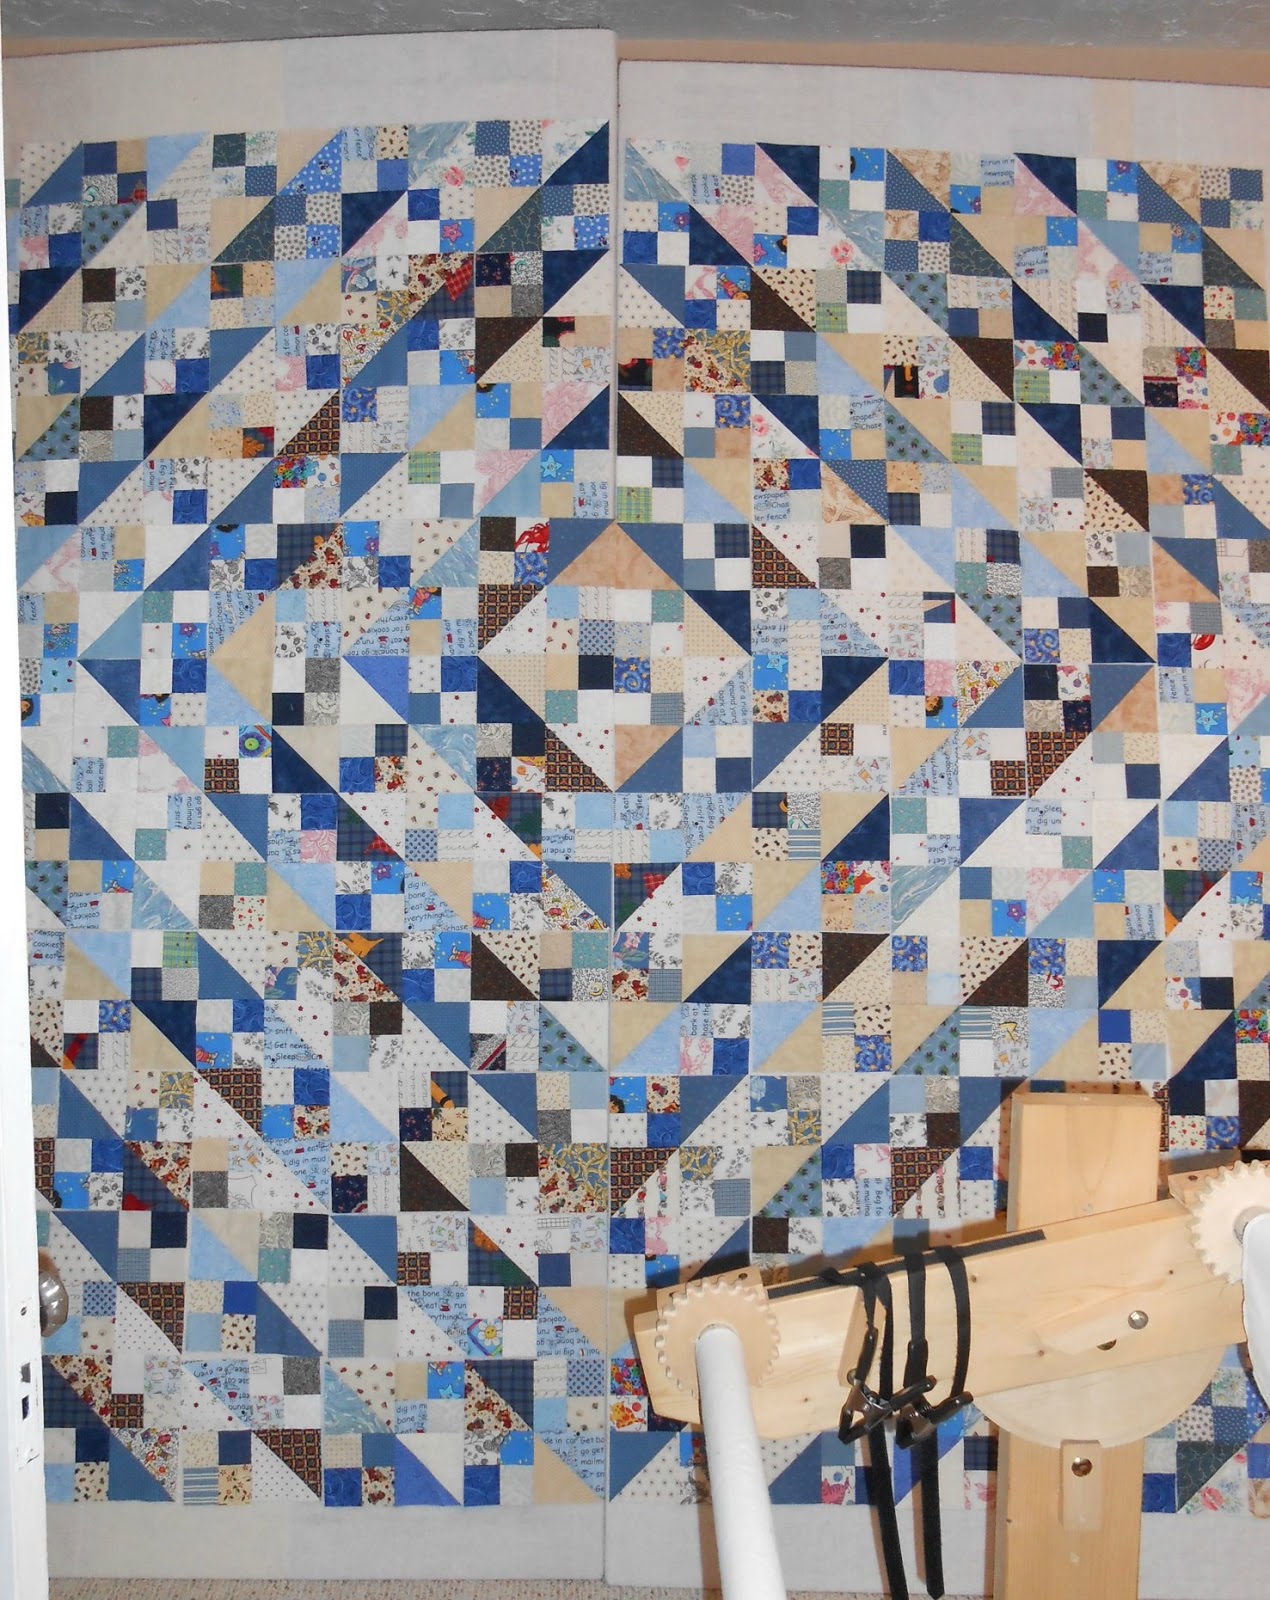
Last evening, I pulled out all of the blocks and arranged them on my design wall.  


There are still two more rows to go across the top, but I didn't have room for them on my design wall until I get some of the other rows sewn together.

This quilt pattern is called "Blue Ridge Beauty" by Bonnie Hunter and is from her "Adventures with Leaders & Enders" book.  The pattern calls for 2" strips, but I didn't have any scraps cut into 2" strips, so I used 2.5" strips, instead.  I have PLENTY of those!   This made my unfinished blocks 8.5" instead of 6.5" like hers.  Then I just didn't need to make as many as her pattern called for...I only needed 120 bocks.  The center of the quilt will be 10 blocks by 12 blocks.

It's hard to get a good picture of it on the design wall because it's so big and because of my sewing table and quilting frame, I can't get back far enough to get a good picture.  :(   Oh well, at least you get the general idea.

I started sewing the rows together last night and got about 4 rows joined before my neck started going into spasms again and I had to call it a night.  Hopefully, I can get them all sewn together over the next couple of days, add the two borders, and then get it into the frame for hand quilting.


Loretta


Sunday, May 13, 2012

Happy Mother's Day...

Quote for the Day:
"Good moms let you lick the beaters...
Great moms turn them off first!"
~author unknown

It's Mother's Day here in the USA and I would like to extend a very happy mother's day greeting to all mothers around the world.  This day celebrates YOU!

I know I haven't posted for a while...10 days to be exact...but who's counting???  But I have been around and have been keeping myself busy and out of trouble...at least I'd like to *think* that I have been staying out of trouble!  :)

Sewing and quilting projects have been popping up...so I decided to make a "To Do" list for 2012 to keep me on track.  (I am very much a "list" person!  I have lists all over the house...especially when getting ready for a trip!  LOL)


The first item on the list is "Andrew's valance".  Trinity had asked me to make a valance for Andrew's room to go with his "Bug Jar" quilt.  I didn't have all the fabric to make new "bug jars" to make the valance, so I just went through my stash to see what fabric I had left over from the quilt, cut 10.5" squares from those fabrics and sewed them together.  I backed it with plain muslin.

Here's a picture of it hanging vertically from a hanger for the picture...it obviously will hang horizontally at the top of the window it is intended for.


I can now scratch the first thing off the list!  :)  However, I need to add "finish 'Blue Ridge Beauty'" to the bottom of the list, now!

I started making blocks for "Blue Ridge Beauty" as a "leader/ender" project back in January.  However,  I frequently worked on it when I wanted to sew, but didn't have anything particular in mind to sew.  I have now finished all 120 blocks needed to make the size quilt I want!  

So for the last couple of days I've been doing a lot of this...


...squaring up all 120 of those blocks!!!  :)    I just want you to know how much I HATE HATE HATE squaring up quilt blocks.  **sigh**   But is it a necessary evil if you want your quilt to lay flat!

Here they all are...all squared up and placed in a box for storing until such time that I can make myself a new design wall and then get them arranged and sewn into a quilt top.


Doesn't look like much, does it?  But there's 120 blocks in there...each block has 12 pieces to it...for a total of 1440 pieces that I have sewn together!  And that doesn't include the borders that I will add to it! 

That's why the description of a quilter is:  Someone who takes LARGE pieces of fabric...cuts them into SMALL pieces of fabric...and sews them back into LARGE pieces of fabric again!  LOL   Yes...it's insanity...but it's fun!  :)

In the meantime, I'm working away on the daffodil quilt that is in my hand quilting frame right now.  I've also been busy doing some mending that's been piling up in my sewing room...when we start running out of clothes to wear, it's time to tackle the mending!  LOL


Loretta

Tuesday, February 21, 2012

Making Do...

Quote for the Day:
"There's more than one way to skin a cat"
~original author unknown
but quoted often by my dad!  :)


The story you about to hear is real.  Feel free to try this at home!  :)


On Sunday I decided that I needed to do something with these apples.  They had been sitting on the table for a while now and just weren't getting eaten.  Either I did something with them or they would probably end up in the trash.  :(  And I HATE to waste anything...a lesson taught me by my Depression-era parents!  :)

I decided that I wanted to make this...


But...uh oh...I only had less than 1/2 cup of brown sugar...

 
Without sending Andy to Walmart to pick up more, what's a girl to do???  (You didn't expect ME to go to Walmart, did you???)

Once upon a time, long, long ago, in a distant land, (???)  I had read in a book of helpful, frugal hints that you could MAKE brown sugar...but just how currently eluded me.  Thank God for the internet...you can GOOGLE anything these day!  LOL

Here's what you need to make your own brown sugar...
                                      

Take one tablespoon of molasses and one cup of white sugar and mix together with a fork or beater.   The instructions I read said that either way you are still going to have to use a fork, so I just went for the fork instead of dirtying up the beaters AND a fork.  


It starts out like this...


...but after about 45 seconds, looks like this....

...and after about 2-3 minutes total of mixing, you can't tell the difference between the homemade and the store bought.

Nice and fluffy and moist!  Just like brown sugar when you first open the bag!  :)

I decided to add some dried cranberries and dried dates to the apples just to give it a little extra "spunk"...


And here it is...fresh out of the oven...
MMMMMMM...boy was it good, too!  (I think there's one helping left from when I made this on Sunday, LOL)


On Saturday, I had taken my primary sewing machine into the shop to be cleaned...a "Well Baby" check-up, they call it there because they know that these sewing machines are our "babies"!  :)  But Sunday afternoon I was feeling the need to cut fabric for a new quilt and start sewing on it.  What is a lady (and I use that term "lady" loosely, LOL) to do when her main sewing machine is away from home?  

Well...let's see...there are four other sewing machines for me to choose from!  LOL  So I chose to bring "Beyonce" out of her case and sew on her for a while.


Why did I name this machine "Beyonce"?  Because she is a beautiful, caramel-colored Singer with fine moves!  :):):)  

Yep, this is the vintage Singer 301 that I bought at an auction last summer for the grand total of $2.00!!!   I have a Singer Featherweight 221, too, but I actually like this machine better, I think.  The 301 sews so smoothly and seems faster than the 221.  Also, the whole "tininess" of the 221 is a little strange to get used to, but this one feels more like a regular sized machine, even though it's about 3/4's the size of a full-sized machine.  The other thing I like about this machine is that you don't have to turn the fly wheel to get the needle moving, and I recall that when I did a few test runs with the Featherweight, I always had to turn the fly wheel to start the needle. 

I've not done much sewing with either of these machines until now.  I had purchased them to take to quilting classes, but so far hadn't taken any classes.  This November, I'm taking a workshop from Bonnie Hunter, so I thought I'd pull out this one and experiment with it to find my perfect 1/4" stitch before actually trying to take a class with it.  It has taken some time to find my perfect 1/4", but I finally found it by having Andy break off the flange of a 1/4" flanged sewing foot.  :)  By using the flange, I couldn't get a "scant" 1/4" and the seam allowance was a couple threads to wide.  But by breaking off the flange and running the fabric directly down the right edge of the foot, I get the PERFECT 1/4" seam!  :)


On Sunday, I had cut out some blue and neutral pieces from my scrap bins to make a Blue Ridge Beauty quilt as a leader/ender project.  (Leader/enders are pieces of fabric you put under your needle when you finish sewing so you aren't always clipping threads.)   Instead of using just trash pieces of fabric, if you put precut pieces to a quilt through there, then you end up with a second quilt...eventually!   However, I wasn't able to just cut these pieces and let them be...I had to sew some together to see what the block looked like in person... and I now have 20 completed blocks!  LOL  I think this L/E project has quickly become my primary project!  :)


Loretta